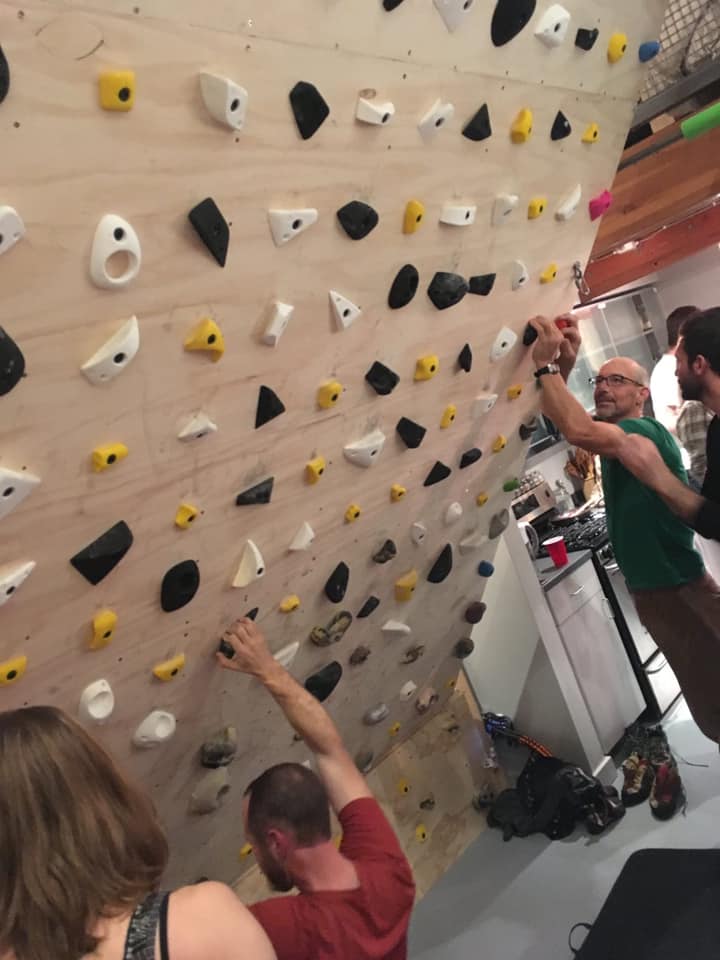
The MoonBoard is a standardised interactive training wall that connects a global community of climbers through shared problems and competitive performance rankings.
https://www.moonboard.com/
Adjustable Angle Moonboard
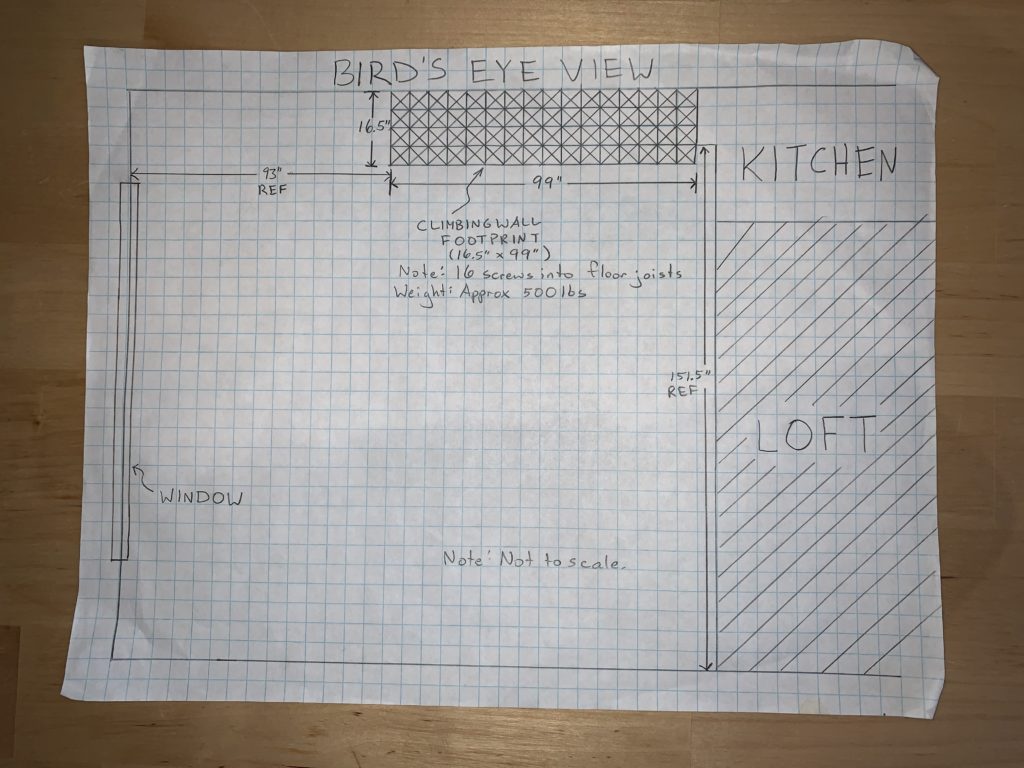
Jeff and I built a Moonboard climbing wall in our loft to climb and train in the convenience of our home. (See our channel @belltown.woody) To save living room space, we designed it to be able to change the angle, raising and lowering it on a winch. When we want to host a hard bouldering session, we lower the hinged wall to 40° overhanging, and when the sesh is over we raise it upright to get our living room back. The vertical angle makes the wall much more accessible, becoming a good tool for ARCing and for easier bouldering.
If you want to build a normal climbing wall, the Metolius Guide is very helpful with general information on building a home bouldering wall. But if you want a climbing wall that is standardized around the world, and has an interactive app to create and share problems, check out the Moonboard, the Tension Board, or the Kilter Board among the growing list of interaction bouldering walls.
Building a Moonboard
There are two ways to build a MoonBoard:
https://www.moonboard.com/how-to-build-your-moonboard#buildinfo
- BUY A MOONBOARD KIT
The easiest method is to purchase one of our official build kits which include all MoonBoard holds, the LED system and ready-to-install panels. Choose from:- Freestanding MoonBoard Kit (includes a frame)
- DIY MoonBoard Kit (frame not included)
- SELF BUILD
Buy all the individual MoonBoard components and source your own panel materials. It is essential that you space and drill the hold and LED holes exactly to the specifications outlined in our self-build instruction guide below. If your self-drilled MB panels do not precisely match the official MoonBoard configuration, the difficulty and feel of climbs will be affected. To save yourself the headache, purchase your panels directly from Moon Climbing. They will arrive pre-drilled, t-nutted and painted with the classic MoonBoard design.
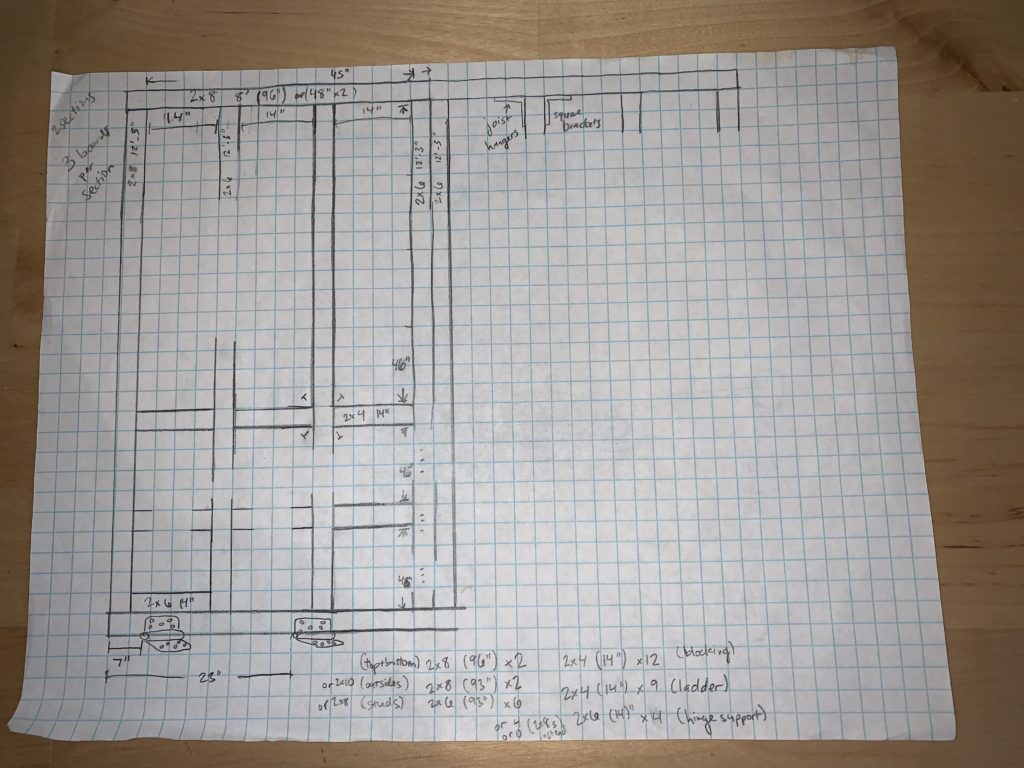
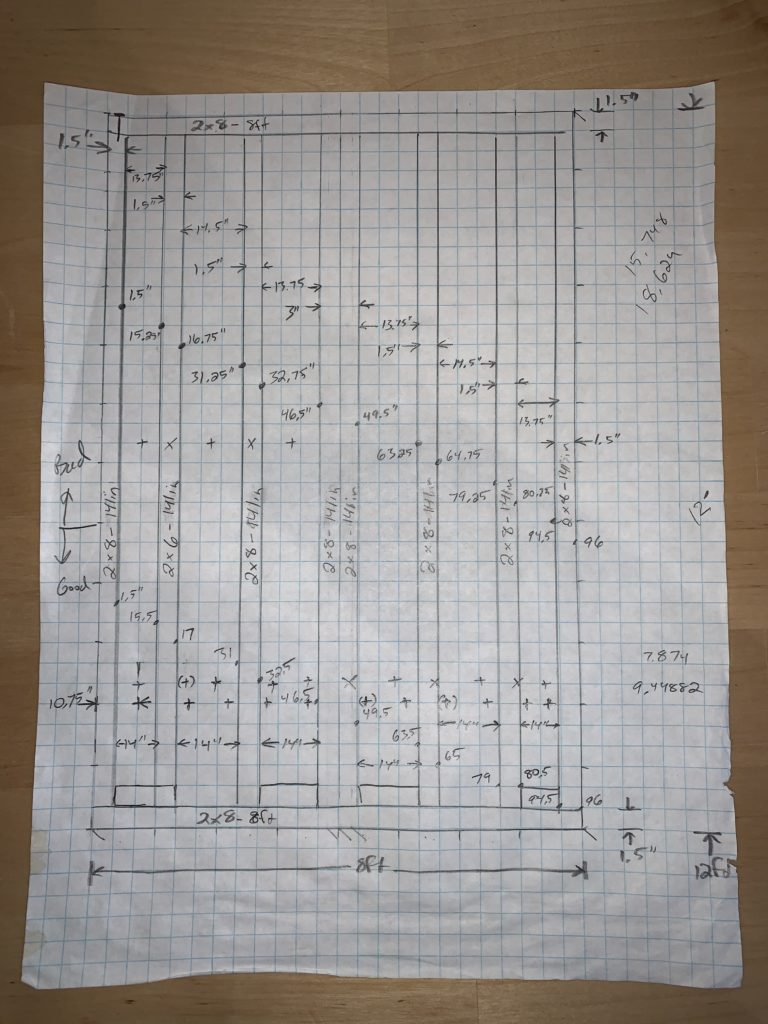
We chose Route 2: Self Build: https://www.moonboard.com/Content/Information/How-to-build-a-MoonBoard.pdf

Basic Moonboard Materials and Tools
Materials
The Materials required to build a full Moon board are as follows
— 3 plywood boards 18mm thick and 8ft high by 4ft wide
— 1 plywood sheet 8ft wide, by 37cm high for the kickboard
— 4 x 2inch by 4inch rough sawn timber 3.63m for framework
— 2 x 2inch by 4 inch rough sawn timber 8ft long for kickboard
— 200 x M10 T-nuts
— Approximately 100 wood screws minimum of 1.5 inch long
— Moon School Room Holds
Tools
The following tools are basic essentials for building a moon board
— Tape Measure
— Pen
— Saw
— Screw driver
— Drill
— Hammer
However for easier and quicker building, power tools such as mitre
saws, circular saws, electric screw drivers / drills will come in very
handy
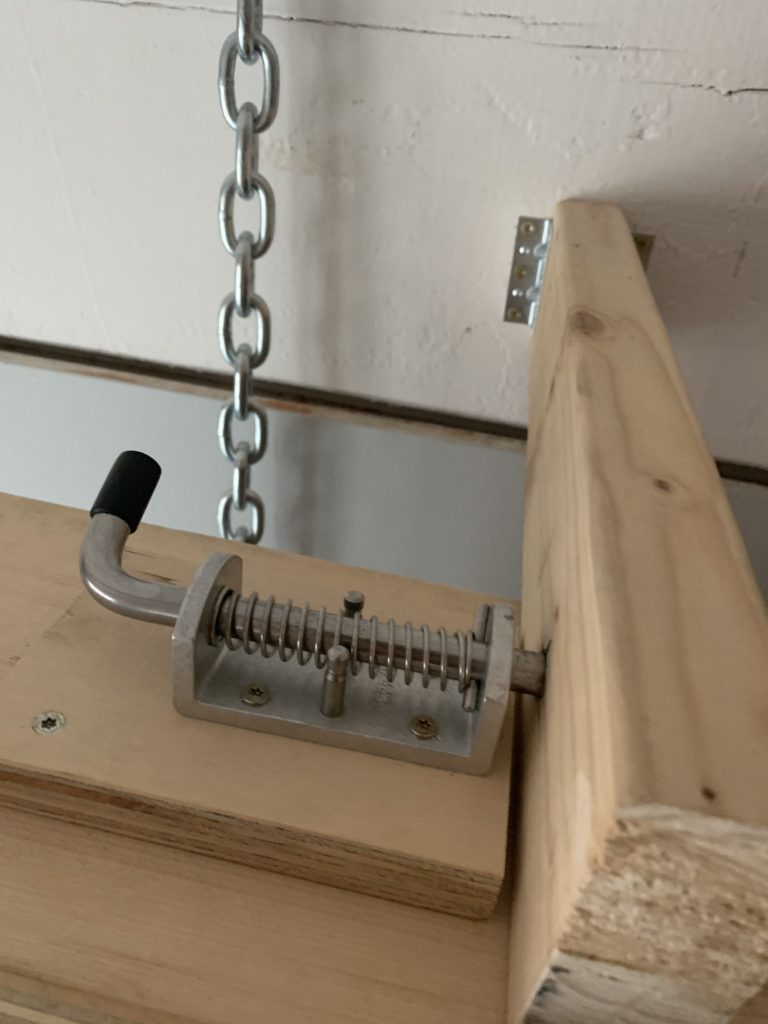
The Winch
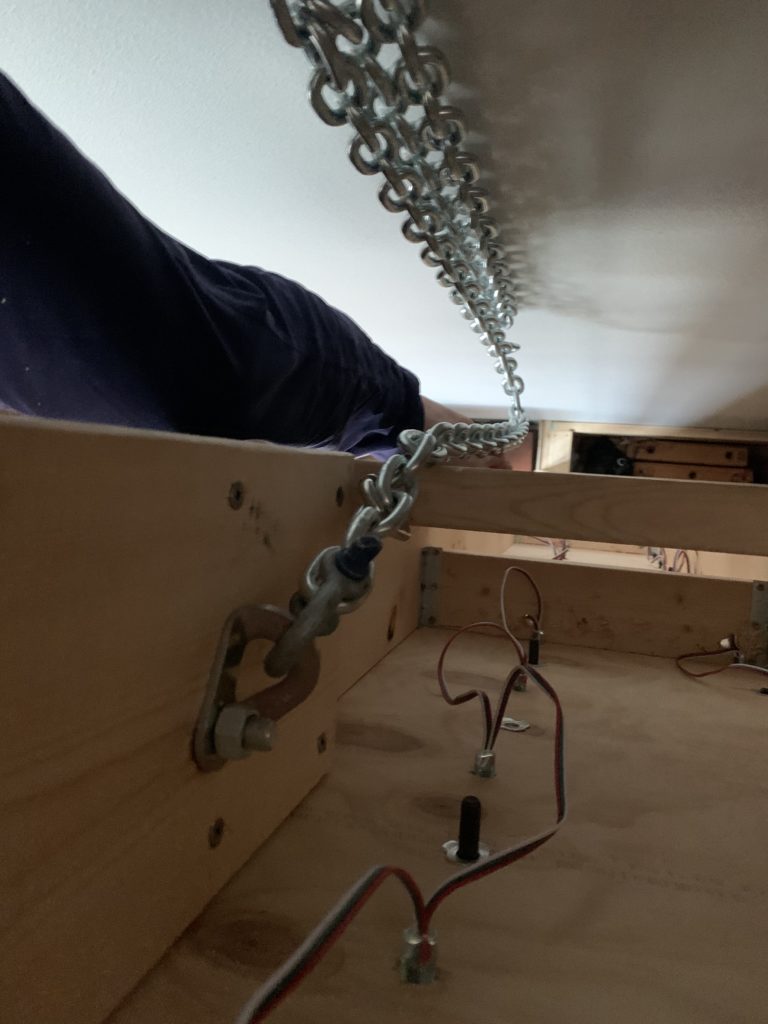

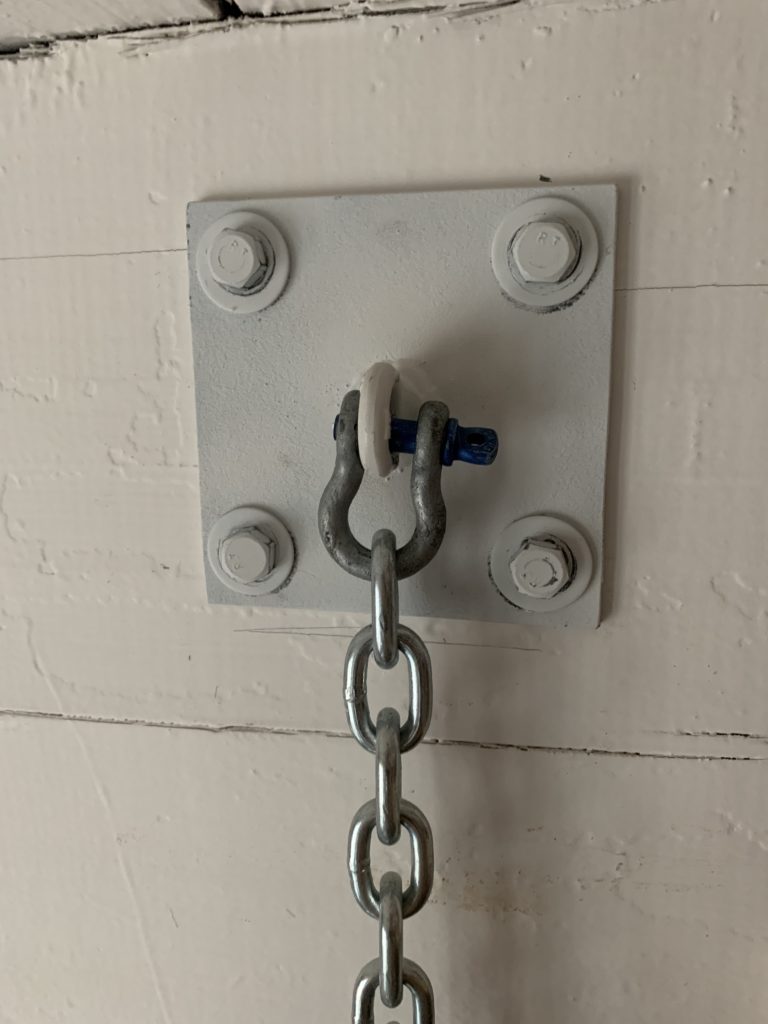
Our climber friend and expert rigger Ryan Daudistel (On Sight Access) helped us by welding custom Pad-eyes and a frame for the winch to be mounted on. Thanks Ryan!
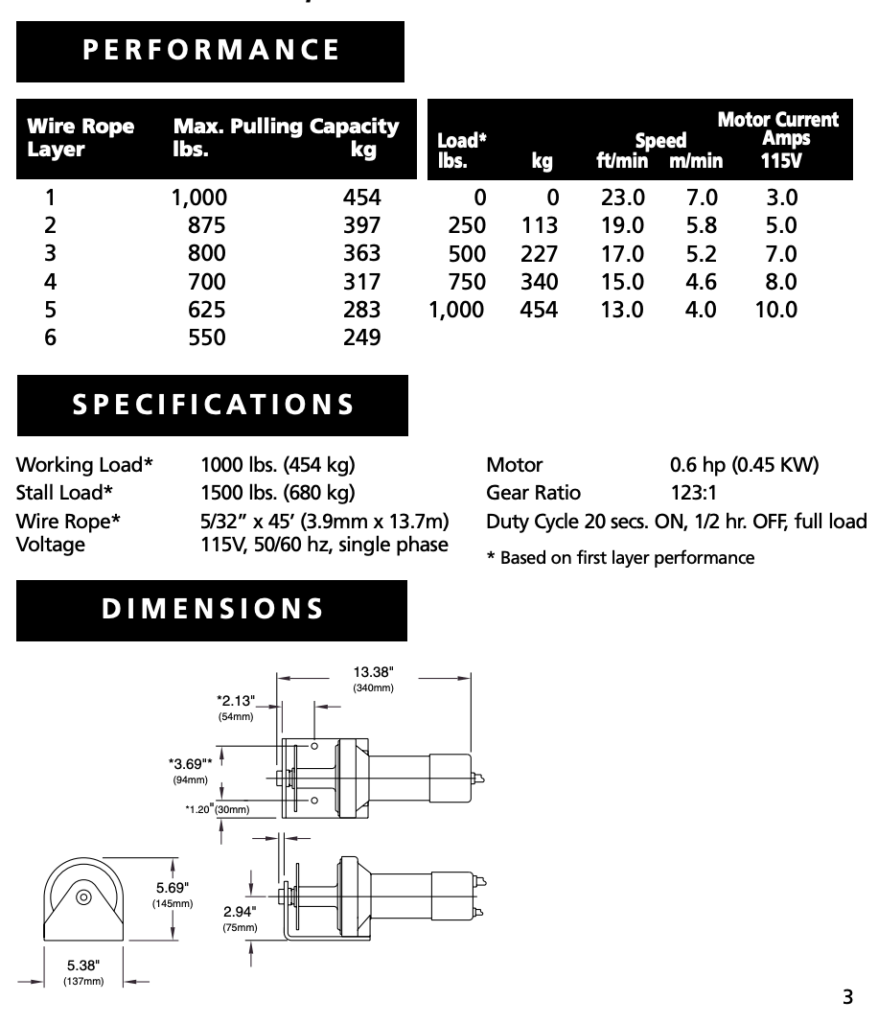
Raising the wall must move ~1000 lbs of load from the lumber, hardware and holds. Winches are made for horizontal or vertical loading and have different braking system for each. The cable will need to be absolute minimum of 17′ for full extension.
The first winding/layer of cable is actually when the winch is at its highest capacity, as the outlayers create more torque that work against the gears.
In other words the strength of a winch is max when it is fully wound around the spool, and lesser with each layer that is unwound.
Weight: ~250# for lumber frame, ~200# for plywood. ~100# for hardware and holds. ~200# for a person, although we probably won’t have a person on the wall while raising and lowering. Note: The load will not be dynamic or used for holding the wall, we use chains on the sides for that. It’s only for raising/lowering into place. It might be used while changing out holds though (when lowered to ~ 6′ from ground)
All “cheap,” over the counter, motorized winches that I’ve seen are noisy. You have to spend a lot of money to get a lot of money to get a quiet, motorized, winch, that’s otc. that being said, you can build a quiet one, by adding a motor to the drive line of your winch. It takes some fiddling around and a day or so in the fab shop, but you can make a quiet rig, custom suited for your project.
Ryan
We bought a SUPERWINCH AC1000 – 1,000 LBS/115VAC and it is quite loud. Manual
For the winch we needed two 7/16″ (12mm) diameter holes in the plate with centers 3 11/16in (94mm) apart vertically to mount the winch to the plate. Page 2 of the manual has dimensional drawings. We have 6 extra holes on the plate for lag bolts to the wall. The winch comes with mounting hardware, but we needed hardware to mount the plate to the beam.
(x1) Center mounting plate for winch. 6 holes for mounting plate to beam, plus 2 holes for mounting winch to plate. Plus lag bolts and washers for mounting the plate.
(x2) Corner Pad-eye mounting plate for chains. 4 holes (each) for mounting plate to beam, plus 1 center Eye (each) for connecting the climbing wall. Plus lag bolts and washers for mounting the plate.
Put it together!
- Build it
- Buy the Moonboard holds
- Get the App
- Find a Moonboard near you
- Get climbing!


1 Comment
Priti Wright · November 24, 2019 at 12:52 am
This post was rather hastily put together, feel free to ask questions, and I’ll try to update the post with more details. Thanks for you patience!
Comments are closed.